Thursday, March 13, 2008

Bluetooth File Transfer in Linux

If you run the KDE or GNOME desktop systems on Linux, you can use their Bluetooth graphical user interface (GUI) tools to send and receive files to and from mobile phones:

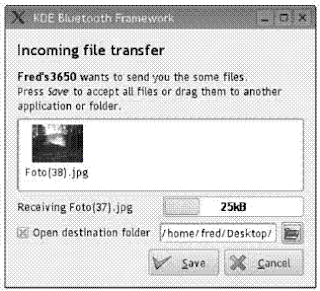
You can download the KDE Bluetooth Framework from the project's web page at http://kde-bluetooth.sourceforge.net/. Figure above shows a Bluetooth incoming file received by the KDE Bluetooth Framework GUI.

You can download the GNOME Bluetooth Subsystem from the project's web page at http://usefulinc.com/software/gnome-bluetooth.

How to Transfer File Using Bluetooth?

The Bluetooth File Transfer service allows any two Bluetooth-enabled devices to exchange files.

To send a file (e.g., an image file in the Gallery application) from your mobile phone, navigate to the file and choose Send Via Bluetooth from the Options menu. Then, choose a device from a list of local devices to send the file to. The devices are identified by their Bluetooth names.

When a Nokia phone receives an incoming file, the file is delivered to the Inbox. When the user opens the message, the phone automatically identifies the file type and processes it accordingly. For example, a received image is saved to the Gallery, a business card is stored to the Contacts list, and an application installation package is executed. To send a file from a computer, you need to use an operating systemspecific Bluetooth file exchange utility, described in the following sections.

You can send only one file at a time over Bluetooth. Hence, this method can be tedious if you need to transfer many files (e.g., photos from a multiday trip). The ZipMan application, available from Symbian (http://www.wildpalm.co.uk/ZipMan7650.html), allows you to create a zip archive of multiple files on your phone and send them all together to a computer. If you need to send many files from a PC to your phone, you can also zip them together first and then use Zip-Man to extract the files from the archive once the phone receives the zipped file.

Windows versions before XP Service Pack 2 (SP2)
With the WIDCOMM Bluetooth utility installed, you can use the File Transfer service to send and receive files. You can right-click the Bluetooth icon in the system tray to bring up the pop-up menu that lists all available services. The received files and business cards are automatically stored into specified directories on the local disk. You can configure those destination directories in the Bluetooth configuration tool.

Windows XP SP2.
On Windows XP SP2, a Bluetooth File Transfer Wizard is located under the Start Programs Accessories Communications menu. The wizard allows you to send and receive files to and from other Bluetooth devices. If you choose to send a file, the wizard first prompts you to choose a target device and then asks you to select the file to send from the PC. If you choose to receive a file, the PC listens for the incoming file and prompts you to save it once it arrives. Alternatively, you can right-click the Bluetooth icon in the system tray and select the "Send a file" or "Receive a file" menu item to directly invoke the appropriate functionalities in the Bluetooth File Transfer Wizard.

You have to click the "Receive a file" choice to prepare the PC to receive files over Bluetooth. Otherwise, the device will show a Connection Failed message when you try to send a file to the PC.

Sunday, March 9, 2008

Using the Nokia PC Suite for File Exchange

You can exchange files between a Nokia mobile phone and a computer in a variety of ways, including via the Nokia PC Suite, Bluetooth file transfer, infrared beaming, email, MMS, and web downloading and uploading.

In this section, I'll discuss ways to send and receive files to and from a mobile phone. Why do you want to do that? Well, here are some example scenarios:

If you have a camera phone, you probably want to download your pictures to your PC or web site for editing or sharing.

You might want to customize your phone with wallpaper and ring tones stored in media files.

You might want to exchange contacts (i.e., business cards) and calendar items between the computer and the phone via VCF-formatted files. The native Personal Information Manager (PIM) applications on the computer or on the phone can process these files once they arrive.

The list goes on. But this gives you an idea why file exchange with a mobile phone is important. As you can see, it is often the basis for further hacks.

Once a file is transferred to your phone, you can use the appropriate program to locate and process the file. For instance, media files are handled by the Gallery program, application installation files are handled by the Application Manager program, and VCF files (business cards) are handled by the Contacts program. If a file has an unknown format, you can locate and examine it using a file browser program such as FExplorer.

The easiest way to exchange files between a Nokia phone and a Windows-based PC is to use the Nokia Phone Browser program in the Nokia PC Suite. The program adds a Nokia Phone Browser folder to the root directory in the Windows File Explorer. Each device that is connected to the PC Suite shows up as a subdirectory in the Nokia Phone Browser folder. Each device directory is identified by its name (e.g., its Bluetooth name if the device is connected via Bluetooth).

You can drag files into and out of the mapped device folders in the Windows File Explorer. The changes are automatically synchronized to the device. In addition to the phone browser, the Nokia PC Suite also provides audio, image, and video manager programs so that you can manage mobile multimedia files on your phone.

You can also use the Nokia PC Suite to transfer and install Java and Symbian application installation files into your phone.

The advantages of the Nokia PC Suite are its easy-to-use interface and its support for multiple connection methods, including Bluetooth, infrared data connection, USB cable, and serial cable. However, as I discussed in "Use the Nokia PC Suite", the Nokia PC Suite does not fit all usage scenarios. In the rest of this hack, I will discuss other ways to exchange files between a Nokia phone and a computer.

Using CallRecorder for recording phone calls

CallRecorder (http://www.symbianware.com/product.php?id=callrecorder60) is another Symbian program for recording phone calls on Nokia Series 60 devices. Like Extended Recorder, it records both incoming and outgoing calls.

The unique feature of CallRecorder is that it provides finely grained control over exactly which calls are recorded. For instance, you can configure it to record all calls made to numbers with the 512 area code, or all calls received from a certain person in your Contacts list. You can also decide whether to record on a per-call basis. The CallRecorder program can prompt you to elect whether to record the call when the caller or called number matches a certain pattern.

On the other end of the spectrum, SymbianWare's CallCheater program (http://www.symbianware.com/product.php?id=callcheater60) generates static sound and injects it into your conversation. That simulates bad signal reception and allows you to drop an unwanted call without offending the other party.

Tuesday, March 4, 2008

How to do Extended Recording for your phone?

The Extended Recorder program from Psiloc
(http://www.psiloc.com/index.html?id=167) supports recording phone conversations on Nokia Series 60 phones. Unlike most answering machines on landline phones, the Extended Recorder program records into a digital audio file, which you can copy, share, and manage on a computer. The program supports several convenient ways to start and stop the recording. By default, you can use the Pen/ ABC key to start and the green Call key to stop the recording at any time in the conversation.

Extended Recorder provides more features than call recording.

You can also configure the program to record all incoming calls from specific numbers in the Settings menu. The Extended Recorder program needs to run in the background for the function to take effect. To put Extended Recorder in the background, just start it as you normally would and then press the red End key to return to the Main menu without exiting it.

To confirm that Extended Recorder is indeed running in the background, press and hold the "menu" key on the phone keypad. You should see the Extended Recorder icon in the icon list at the upper-right side of the phone screen.

If you want to record an outgoing conversation, you can use the Make & record call menu to make the call

Record a Phone Call

Record important phone conversations on your Nokia smartphone.

From time to time, we often need to record phone conversations for business or personal reasons. For instance, when you order merchandise over the phone, you probably want to keep a record of exactly what was agreed on in case a dispute arises in the future. On a landline telephone, you can use an answering machine to record phone conversations when you talk with lawyers, accountants, technical support, or even sales agents. But for mobile phones, the "answering machines" are located in the operator's server room. They record messages for missed calls but do not provide a way to record a conversation once you pick up your phone. How do you record a phone conversation on your mobile phone?

In some jurisdictions, the law requires you to notify the other party that the conversation is being recorded.

On a Nokia Series 40 phone, you can record a phone conversation using the Options Record menu from the idle screen while the phone call is in progress. The recorded conversation is saved as an audio clip in the phone's Gallery. Most Series 40 phones support up to three minutes of recording time.

Nokia Series 60 phones do not support phone conversation recording out of the box. But third-party programs are available that add powerful recorder functionality to Series 60 phones. In this hack, I discuss two such programs.

How to Make Conference Calls?

Once you have more than one connected call (i.e., several text boxes appear on the idle screen), you can activate all of them at once by choosing Options>Conference. This opens up a conference and allows all callers connected to your phone to hear each other. Please note that, for you to do this, your mobile operator and your service plan must support conference calling. Also, when you look at your statement, you'll see that the number of minutes is the actual number of minutes you used, multiplied by the number of callers. Hence, it's a good idea to use mobile-to-mobile minutes or night and weekend minutes for long conference calls.

As a simple tips, you can also put the phone on loudspeaker via the Options >Activate loudsp menu item while the call is in progress. If the volume is loud and the room is quiet, all the people around the table will be able to hear the conversation and participate in the call.